Posts Tagged tracking

Artwork Tracker for Mac v1.1 update now available

The Artwork Tracker for Mac v1.1 update is now available on the Mac App Store.

Artwork Tracker makes keeping track of your art collection easy. Never wonder again where or when you submitted your art. The information is all right there on your Mac!

Whether you’re a working artist, a collector, or an art dealer, Artwork Tracker is a valuable addition to your artistic toolbox.

Artwork Tracker

For direct purchase customers, click ‘Check for Updates…’ in the Artwork Tracker menu within the app and follow the prompts to update.

This update contains the following changes:

This update requires Mac OS X 10.7 (Lion) or higher!

  • Increased photo resolution when adding new photos.
  • Added Extra-Large photos option for the Artwork Report feature.
  • Added Exhibiting, Donated, and Gifted Submission states.
  • Info windows can now be resized.
  • Increased photo caption font size.
  • Bug fixes.

If you’re enjoying the app, please take a moment to rate or review it on the Mac App Store!

You can learn more about Artwork Tracker at my website or on the Artwork Tracker Facebook group.
Tags: , , , , ,

Introducing Plant Album

Plant Album is now available on the App Store for iPhone, iPad, and iPod touch.

Plant Album

Download on the App Store

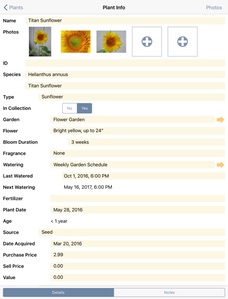
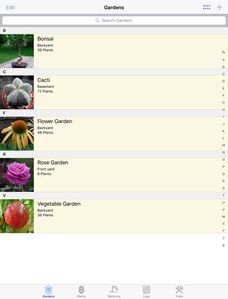
Today my new iOS app for gardeners, Plant Album, hit the App Store. Plant Album is available for iPhone, iPad, and iPod touch with iOS 8.0 or higher. Organize your plants into gardens, tracking watering schedules, keep dated log entries, and more.

Plant Album is localized into several languages, including English, French, Italian, German, Spanish, and Portuguese.

The Plant Album database can be moved between your various devices, so you can back it up to your computer over a local WiFi network from either an iPhone, iPad, or iPod, and restore it onto another Apple device. You can also import or export data without modifying the existing data on your device, or transfer the database directly between devices via AirDrop.

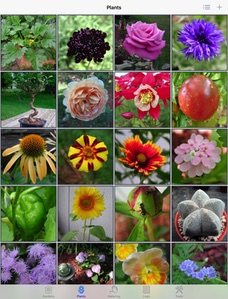
The Gardens, Plants and Logs tabs of the app display thumbnail images in table form for each garden, plant, or log entry. In addition, the garden and plant thumbnail images can be viewed in a scrollable grid. This makes it easier to locate an item in your collection visually, or based on the name, garden, or species. As with my other apps, the user interface has been designed for quick and easy data entry.

You can find more details on my website or on the Plant Album Facebook page. There’s also a free Lite version you can try out. This version is limited to 3 gardens, 3 plants, 3 watering schedules, and 3 log entries with 3 photos each, and only supports backup and export over WiFi. Otherwise it’s identical to the full version.

If you’re interested in the origins of Plant Album, you can read more in my earlier blog post.

I hope you find Plant Album to be a fun and useful gardening app, and I welcome any feature suggestions and comments you may have. Enjoy!

Tags: , , , , , ,

Plant Album – Frequently Asked Questions (FAQ)

Plant Album

The following will hopefully address any questions or concerns you may have about Plant Album. I’ll be updating this post as new questions arise. Let me know if I’ve missed anything!

1. Is Plant Album available for my Mac, PC, Android phone, or other platform of choice? If not, when?

Plant Album is available on the Apple iTunes App Store for the iPhone, iPad, and iPod touch. You can learn more about the app here.

If there’s sufficient interest, I may develop Mac and PC versions. I currently have no plans for any other platforms.

2. I have an iPad and an iPhone. Do I have to buy the app twice?

No, Plant Album is a universal app, so provided you use the same iTunes account on all your devices, you only have to buy the app once, and it can be installed on all your iOS devices.

3. I’m not sure if Plant Album will suit my needs. Is there a free trial version available?

Yes, Plant Album Lite is available on the App Store, for free. This contains all the features of the full version, other than the database import and restore. It’s also limited to 3 gardens, 3 plants, 3 watering schedules, and 3 log entries with 3 photos each. That should be enough to give you some idea of whether the app will work for you.

4. Will Plant Album be localized into my language soon?

Possibly. The app is currently localized into English, French, Italian, German, Spanish and Portuguese. I’ll be analyzing download and sales numbers to determine whether localization is worthwhile for any other languages.

5. Can I export photos from the database?

Yes – see question 21. Also note that the originals are left undisturbed in the photo library on your device. Photos taken within the app are saved to the camera roll on your device. You may also tap on any photo, followed by the share button at the bottom-center of the full-size photo screen.

6. Is it possible to sort the plants by species or garden, rather than name?

Tap the Settings button on the Tools screen and select either the “Sort plants by species” button or the “Sort plants by garden” button under Sort Options. Tap Done, and you’ll find all plants are now sorted by species or garden. Change these settings back to Off to sort by name again.

7. What is the purpose of the button next to the plus button on the gardens and plants screen?

This button is used to toggle between the table view and the photo grid view. The photo grid displays larger versions of the thumbnail photos seen in the table view, with empty cells for those gardens or plants without a stored photo. With a large collection, the photo grid view is scrollable, and it should be easier to locate a particular garden or plant than with the table view. Tapping a photo in the grid will display the information associated with that photo.

8. What is the purpose of the Type field on the Log Info screen?

The type field is used by the app to determine what should be displayed in the Logs list for that log entry. For instance, selecting Garden will show the garden name selected in the Garden field, selecting Plant will show the plant name in the Plant field, and Note will show a brief summary taken from the Notes field. Select either Garden, Plant, or Note in the Type field depending on what information that particular log entry is recording.

9. How do I re-order the photos on the Garden Info, Plant Info, or Log Info screens?

After the entry has been saved, tap on it and then tap the Photos button in the upper-right part of the screen. This will show all the photos associated with the Garden, Plant, or Log. Tap and hold on the photo you’d like to move on the Info screen, then drag it to its new position. When you return to the Info screen the photo slots will reflect the new order.

10. How do I add text captions to my photos? How can I hide them to take a closer look at the photo?

Tap on the photo you’d like to add a caption to. Tap the word balloon icon at the bottom of the screen (the one near the middle), then type in the text caption you’d like to associate with that photo. Tap Done. The new or modified text caption will now be displayed. Note that only the first few lines of the caption will be superimposed over the photo. To hide the captions along with the icons and navigation bar, tap once on the photo. You can scroll between the photos by swiping left and right, and zoom-in by making a pinching gesture, or double-tapping.

11. How do I capture sold, stolen or dead plants, or other events?

The place for capturing these events is on the Log Entry screen. Create a new Log entry, tap the Event field followed by the Add New Event button. Type in the new Event (Sold, for instance) and tap Done or outside the field (on iPad). The new Event will now be available for use with this and other log entries. Select the Event, then on the Plant field, select the corresponding plant. Set the Type field to Plant. Set the date the Event occurred, and add any relevant photos or notes. Tap Done, and the new dated Log entry will appear in the list. Now when you tap the Log History button on the Plant Info screen, you’ll see the complete history of the plant. You may also wish to set the plant’s In Collection field to No if you no longer own the plant.

12. How do I backup the Plant Album database to my computer?

To transfer the data to your computer, you’ll need all devices on the same local WiFi network as your computer (Mac, PC, or other). Note that all the data is still saved on your device and backed-up whenever you do an iTunes or iCloud backup.

To transfer to your computer and also to a spreadsheet, follow these steps:

(1) Tap the Backup Database button on the Tools screen within the app. If you only want to backup garden, plant and watering schedule data, tap Export Data instead. The app will display a message with the IP address (some numbers) of your device on your network. It might look something like this: http://192.168.1.104:8080
(2) Enter the address displayed by the app into the web browser on your computer. You should see a Plant Album page appear. This is actually from the app on your device.
(3) Download the Plant Album PDBI file to your computer. You might also want to download the CSV file. This CSV file can be imported into a spreadsheet program on your computer, while the PDBI file is only readable via the app. Note that only the PDBI file contains the garden, plant and log photos.

Plant Album also supports iTunes File Sharing. Open iTunes, navigate to the Apps section on your device, and click on the Plant Album icon in the File Sharing section. The database filename will appear in the table on the right.

13. I have a Plant Album database on my computer. How do I transfer it back to my device?

As with database backup, you’ll need all devices on the same local WiFi network as your computer (Mac, PC, or other).

(1) Tap the Restore Database button on the Tools screen within the app. If you don’t want to completely overwrite the database on your device, you might want to select Import Database instead. Note that if you’re importing, you may see duplicate entries on your device after the import is complete. The app will display a message with the IP address (some numbers) of your device on your network.
(2) Enter the address displayed by the app into the web browser on your computer. You should see a Plant Album page appear.
(3) Within the web browser, select the Plant Album PDBI file on your computer. Click the Restore (or Import) button in your browser to send the database to your device.
(4) Your device will receive the database and will ask for confirmation, displaying some info about the database.
(5) Tap the Restore button on your device and the database will be processed. If you’re importing instead, you’ll see another screen where you can select what you want to import (All, only Gardens, only Plants, only Watering Schedules, or Gardens, Plants and Watering Schedules).
(6) Once complete, the app will display a popup letting you know the transfer is complete. The data from your computer will now be on your device.

14. I have an iPad and an iPhone. How do I keep the databases in sync between them? Does the app have iCloud support?

Plant Album currently doesn’t have a simple means of keeping databases synchronized on separate devices. However, it is easy to transfer the database between them via AirDrop.

If you have an older device that does not support AirDrop, follow the steps below to transfer the database between devices manually:

1. Select Backup Database on the first device.
2. Enter the address into the web browser on the second device.
3. Tap the “plantalbum.pdbi” link and wait for the file to download.
4. Tap the Open in “Plant Album” button.
5. Plant Album will load. Tap Restore to transfer the complete database.

Plant Album does not support syncing via iCloud, nor is it likely to in the future for myriad technical reasons.

15. I have Plant Album Lite and just bought the full version. How do I transfer my data from the Lite version?

After you’ve purchased the full version and run it at least once, load the Lite version and tap on the tools icon on the bottom-right of the screen. Tap the “Export to Full App” button, then “Open in Plant Album.” When the full version appears, tap the Restore button to transfer the database.

16. I have a whole spreadsheet of data I’d like to import into the app. How can I do that?

Provided your spreadsheet program can export to CSV format and allows you to specify comma separators and dates in a particular format, you should be able to import it into the app. Plant Album expects to receive CSV data according to the CSV template file, available in the Downloads section of the site. This template file can also be downloaded when connecting to the app via your web browser.

17. Can you incorporate some new fields into the app? Can I change the names of any of the data fields?

Incorporating new fields is possible, but keep in mind that screen real estate is very limited on the iPhone and iPod touch. I’ve tried to select fields that would be useful for most gardeners, and have tried to minimize clutter as much as possible. The notes fields may be used to store additional data for each garden, plant, watering schedule, or log. Sorry, the names of the data fields cannot be changed.

18. How do I use the reminder feature?

First, pick a log entry or create a new one. Select Yes next to the Reminder field, and a popup will appear asking if you want to add a reminder to the calendar. Tap Add and another screen will appear where you can create a calendar entry. If there’s already an entry, it’ll allow you to edit it (or delete it). If Reminder is set to Yes, changing the date will also show a popup asking if you want to add/edit on the calendar. If you leave the app and check your device calendar, the entry should be recorded against the date/time you set.

The idea is you set a future date, set Reminder to Yes, and the log entry will be highlighted on and after that date. The number badge at the bottom of the screen and on the app icon will be updated to reflect the number of Reminders Due (ie highlighted on or after the stored dates). The Reminders Due statistic is also updated. Once you’ve taken care of the task (fertilizing, repotting, etc), set Reminder back to No.

19. How do watering schedules work?

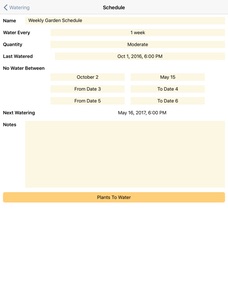
Watering schedules are a convenient way to remind you when certain plants in your collection need watering. You can configure how frequently they need watering (Water Every field), how much (Quantity field), when they were last watered, and when they shouldn’t be watered (No Water Between fields).

The app automatically calculates the next watering date based on the information you’ve entered. If there’s a conflict or insufficient information, you’ll see None Scheduled beside the Next Watering field. A local notification is automatically scheduled on your device once there’s a valid Next Watering date.

Tap the Watering field for individual plants to associate them with a certain watering schedule. If you have a lot of plants, a quicker way is to tap the Watering schedule, tap the Notes button at the bottom of the screen, then tap the Plants To Water button. This will bring up the Plants To Water screen. To add or remove plants from a certain Watering schedule, tap the + button in the top right-hand corner. You can then select which plants to add to the schedule by tapping on them in the list. A blue watering-can icon will appear next to the plants you’ve selected. To remove a plant from the schedule, return to this screen, tap the plant and the watering-can icon will disappear.

By associating a plant with a watering schedule, the Last Watered and Next Watering fields for each associated plant will be updated automatically whenever the Watering schedule is updated. While it is possible to change the Last Watered field directly for individual plants, it is not recommended since the watering of this plant will become out of sync with the associated watering schedule.

20. How do watering schedule local notifications work?

Watering schedule notifications are created whenever you modify the relevant fields on the Watering Schedule screen, with a date / time appearing in the Next Watering field. This field is updated and the local notification changed automatically whenever you update any of the following fields: Water Every, Last Watered, or No Water Between.

The local notification will trigger on your device (or Apple Watch) at the scheduled Next Watering time, whether the app is running or not. The notification will only trigger once. If you’re using the app when the notification triggers, a watering alert will appear on the screen and number badges above Plants and Watering will appear. If you’re outside the app, the notification will appear at the top of your screen, and the app icon’s badge number will change. Tap on the notification to enter the app.

To disable (or enable) local notifications for Plant Album, visit the Notification Center in the Settings on your device. Scroll through the list of apps, select Plant Album, and modify the notification settings to your preference.

21. How do I use the plant report feature? How do I view the plant report?

The plant report feature is enabled by default. To change the report options, tap the Settings button on the Tools screen. From there you can scroll down to the Database Export settings and configure the following options:

(1) Generate plant report – tap this to turn plant report generation On or Off.
(2) Small photos / Medium photos / Large photos / Extra-Large photos – tap this to select the size of the photos that will appear in the plant report. Small photos will display thumbnail versions of each photo, while Extra-Large photos will display full-size photos, as they would appear on an iPad. Medium photos are half the size of the large photos.
(3) Clear cache – tap this to clear the photo cache. This setting is usually not needed.

Once set, the options above will apply whenever the plant report is generated. There is no need to change them every time.

To generate the plant report, tap the Backup Database or Export Data button on the Tools screen. The database may take several seconds or minutes to be prepared, depending on the speed of your device and how large your collection is. Once the database has been prepared, a popup with an address (numbers) will appear. Enter this address into your web browser exactly as it appears. Click on the Plant Report link at the bottom of the web page that appears in your browser. The plant report shows a summary of your collection, followed by the data and photos for every garden, plant, watering schedule, and log entry in your collection. This report can be useful for inventory or insurance purposes, and may be saved or printed from within your web browser.

22. How do I save or print the plant report?

To print the plant report, use your web browser’s print feature. To save the plant report, you can use the web page archiving feature of your web browser. Most web browsers allow you to create an archive of web pages, including all images, for saving to your computer.

In Safari, select the Save As option in the File menu. Ensure the Format or Save as type field is set to Web Archive. Enter the filename and click Save.

In Internet Explorer, select the Save As option in the File menu. Ensure the Save as type field is set to Webpage, complete or Web Archive, single file. Enter the filename and click Save.

In Mozilla Firefox, select the Save As Page option in the File menu. Ensure the Save as type field is set to Web Page, complete. Enter the filename and click Save.

In Google Chrome, select the Save Page As option in the File menu. Ensure the Format field is set to Webpage, Complete. Enter the filename and click Save.

23. When I view the plant report in my web browser, why are some of the photos different to those shown in the app?

The plant report feature uses a cache, which is another way of saying it stores the photos for fast access later. Sometimes the cache may be out of date, causing the app to become confused and start displaying old photos in the plant report. While this is unlikely to occur, you can fix the problem by tapping the Settings button on the Tools screen. Scroll to the bottom of the list to the Database Export settings. Tap Clear cache, and the photo cache will be cleared. Regenerate the plant report to confirm the photos are correct.

24. I just bought the full version of Plant Album, but the app only allows me to store 2 photos per plant (iPhone / iPod), or 5 photos on the iPad. Why don’t you increase this limit? How can I show the complete life of my plant with such a limitation?

While it is true that you only see this limited number of photos on the main Info screen for each Garden, Plant, or Log, there is actually no hard limit on the number of photos you can store, other than the space available on your device. There is limited screen real-estate available, and the small number of photo slots are designed to both fit in the available space and allow you to quickly add a few photos for the plant.

To add more photos, tap the Photos button in the top-right corner on the Info screen for the Garden, Plant, or Log. This will present you with a scrollable photo grid displaying all of the photos for that particular Garden, Plant, or Log. To add more, tap the + button in the top-right corner of the Photos screen.

You may also decide which of your photos best showcases your garden or plant for display on the main Info screen. To choose these photos, rearrange them on the Photos screen for that plant or garden. Place the desired photos in the first through fifth positions. See question 9 for details on re-ordering photos.

25. I have questions, feature requests, or concerns that aren’t listed above. How can I contact you?

You can reach me via email (PlantAlbum@andrewnicolle.com), on the Plant Album Facebook page, or on Twitter (I’m @andrewnicolle). I can usually respond to queries within 24 hours. If you like Plant Album, please spread the word! Share your thoughts with other gardeners by rating or reviewing the app on the App Store. I use this feedback to gauge continued interest in the app and to plan future updates.

Tags: , , , , , ,

Introducing Cactus Album for PC

Track your cactus and succulent collection on your Windows PC – Now Available!

Cactus Album

Today I’m pleased to announce the release of my new Windows PC app, Cactus Album. This is my cactus and succulent tracking tool already available for iOS and Mac.

The PC version is similar to the Mac version and has many of the same features as the iOS version, with the addition of printing, enhanced search capabilities, and data transfer to and from the iOS version over WiFi. I’ve also included some other features like duplicating cactus entries, right-click context menus, and a host of other tweaks and improvements. Cactus Album for PC also has a built-in crash-reporting mechanism and software update notifications.

Cactus Album for PC is localized into English, French, Italian, German, Spanish, Portuguese, and Thai. This also includes every aspect of the installation and ordering process (aside from ordering the app in Thai). Clicking on any of the links below will take you to the information page for the app in each language:

English, Français, Italiano, Deutsch, Español, Português, ไทย

To run Cactus Album on your PC, you’ll need either Windows XP SP3, Windows Vista, Windows 7, Windows 8 / 8.1, or Windows 10. The app also requires the Microsoft .NET Framework 4 with the KB2468871 update patch. These are already included with Windows 8 or higher.

The download version initially runs in an unregistered trial mode, limited to 3 cacti, 3 watering schedules, and 3 logs, with 3 photos each. It will also only allow a single database to be open at a time, and database import is disabled. The full feature-set can be unlocked via purchase, either within the app or via my Web Store.

DownloadBuy Now

You can learn more about all the features of Cactus Album here, check out the Frequently Asked Questions page, or like Cactus Album on Facebook.

Tags: , , , , , , , , ,

Introducing Cactus Album for Mac

Track your cactus and succulent collection on your Mac – Now Available!

Cactus Album

Today I’m pleased to announce the release of my new Mac app, Cactus Album. This is the tool for all your cactus and succulent tracking needs!

The Mac version has similar features to the iOS version, with the addition of printing, enhanced search capabilities, and data transfer to and from the iOS version over WiFi. I’ve also included some other features like duplicating cactus entries, right-click context menus, and a host of other tweaks and improvements. Cactus Album for Mac also has a built-in crash-reporting mechanism and software update notifications.

Cactus Album for Mac is localized into English, French, Italian, German, Spanish, Portuguese, and Thai. This also includes every aspect of the installation and ordering process (aside from ordering the app in Thai). Clicking on any of the links below will take you to the information page for the app in each language:

English, Français, Italiano, Deutsch, Español, Português, ไทย

To run Cactus Album on your Mac, you’ll need either Lion (OS X 10.7.x), Mountain Lion (OS X 10.8.x), Mavericks (OS X 10.9.x), Yosemite (OS X 10.10.x), El Capitan (OS X 10.11.x), or Sierra (macOS 10.12.x).

The download version initially runs in an unregistered trial mode, limited to 3 cacti, 3 watering schedules, and 3 logs, with 3 photos each. It will also only allow a single database to be open at a time, and database import is disabled. The full feature-set can be unlocked via purchase, either within the app or via my Web Store. The app is also available for purchase from the Mac App Store.

DownloadBuy Now

Looking for the Mac App Store version? Click the button below to visit the Mac App Store:

Download on the Mac App Store

You can learn more about all the features of Cactus Album here, check out the Frequently Asked Questions page, or like Cactus Album on Facebook.

Tags: , , , , , , , , , ,

Cactus Album v1.3 update now available for iPhone, iPad and iPod touch

The Cactus Album v1.3 update is now available on the App Store for iPhone, iPad, and iPod touch.

Cactus Album makes keeping track of your plants easy, whether you’re new to cacti and succulents, or an experienced collector. It’s the ideal tool for organizing your plants, watering schedules, and notes.

Cactus Album

This update contains the following changes:

Note: This update requires iOS 8 or higher!

  • Added iOS 10 support.
  • Added support for the Mac and PC versions of Cactus Album.
  • Add multiple photos at a time from your photo library.
  • Increased photo resolution when adding new photos.
  • Added Extra-Large photos option for the Cacti Report feature.
  • Increased photo caption font size.
  • Added photo sharing feature.
  • Bug fixes.

If you’re enjoying the app, please take a moment to rate or review it on the App Store!

You can learn more about Cactus Album at my website or on the Cactus Album Facebook group.

Tags: , , , , , , ,

Cactus Album for Mac – Frequently Asked Questions (FAQ)

The following should address any questions or concerns you may have about Cactus Album for Mac. I’ll be updating this post as new questions arise. Let me know if I’ve missed anything!

1. When will Cactus Album be available for Macs?

Cactus Album for Mac is now available for download from my website here and from the Mac App Store. You can learn more about Cactus Album for Mac here.

2. What Mac OS X operating system do I need to be able to run Cactus Album for Mac?

The app works on Lion (OS X 10.7.x), through to Ventura (macOS 10.13).

3. I already have Cactus Album on my iPhone, iPad, or iPod touch. Do I have to buy it again for the Mac?

Yes, if you would like to run Cactus Album on your Mac, you’ll need to purchase it direct from my site, or from the Mac App Store. The Mac version includes some additional features over and above the iOS version, including photo organization, enhanced search, and printing capabilities. The app had to be substantially re-designed and completely re-written for the Mac platform. Unfortunately porting the app to the Mac wasn’t as simple as you might think!

4. I’m not sure if Cactus Album for Mac will suit my needs. Is there a free trial version available?

Yes, it’s available for download from my website here. The app is initially in an unregistered trial mode, limited to 3 cacti, 3 watering schedules, and 3 logs, with 3 photos each. It will also only allow a single database open at a time, and database import is disabled. That should be enough to give you some idea of whether the app will work for you. Purchasing a license either within the app or via my website unlocks full functionality. You may also purchase via the Mac App Store.

5. Will Cactus Album for Mac be localized into my language soon?

Possibly. Cactus Album is currently localized into English, French, Italian, German, Spanish, Portuguese, and Thai.

6. Is it possible to sort the cacti by species, rather than name?

Click the Preferences… line on the Cactus Album menu and select the “Sort cacti by species” checkbox under Sort Options. Close the window and you’ll find all cacti are now sorted by species. Repeat these steps to sort by name again.

7. What is the purpose of the Type field on the Log Info window?

The type field is used by the app to determine what should be displayed in the Logs list for that log entry. For instance, selecting Cactus will show the cactus name selected in the Cactus field, and Note will show a brief summary taken from the Notes field. Select either Cactus or Note in the Type field depending on what information that particular log entry is recording.

8. How do I re-order the photos on the Cactus Info or Log Info windows?

After the entry has been saved, double-click on it and then click on the All Photos tab. This will show all the photos associated with the Cactus or Log. Click and hold the mouse button on the photo you’d like to organize on the Info window, and move the mouse to where you’d like the photo to be moved. Release the mouse button when you’re done.

To move a photo into one of the primary photo slots on the Cactus Info or Log Info windows, arrange the photos in the All Photos section. The primary photo slots will now reflect the new order.

9. How do I add text captions to my photos? How can I hide them to take a closer look at the photo?

Double-click on the photo you’d like to add a caption to in the All Photos tab of the Cactus Info or Log Info window. Click the word balloon icon at the top of the window, then in the text box that appears, type in the text caption you’d like to associate with that photo. Click on the photo to end editing the caption. The new or modified text caption will now be displayed. Note that only the first few lines of the caption will be superimposed over the photo. To hide the caption, click once on the photo. You can scroll between the photos by clicking the left and right arrow buttons, and zoom-in by resizing the photo window.

10. How do I capture sold, stolen or dead plants, or other events?

The place for capturing these events is on the Log Info window. Create a new Log entry, click the Event field and type in the new Event (Sold, for instance). The new Event will be saved when you click the OK or Save button. It will then be available for use with this and other log entries. In the Cactus field, select the corresponding cactus. Set the Type field to Cactus. Set the date the Event occurred, and add any relevant photos or notes. Click Save, and the new dated Log entry will appear in the list. Now when you tap the Log History button on the Cactus Info window, you’ll see the complete history of the cactus.

11. I have a Cactus Album database on my iPhone, iPad, or iPod touch. How do I transfer it to Cactus Album for Mac?

You’ll need all devices on the same local WiFi network as your Mac. Then follow these steps:

(1) Tap the Backup Database button on the Tools screen within the app on your device.
(2) Create a new database within Cactus Album for Mac and save it to your Documents folder.
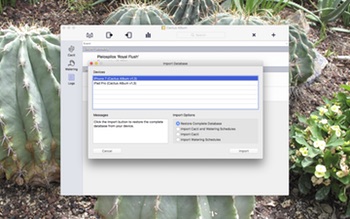
(3) Click the Import Database button in the document window toolbar within Cactus Album for Mac. This is the button next to the printer button. The button has an arrow pointing to the right, away from the device icon. You can also select the Import from -> Cactus Album Mobile App item in the File menu.
(4) The Import Database window will appear. You should see your device shown in the Devices section. If it isn’t there, double-check that you’ve selected Backup Database (or Export Database) on the Tools screen within Cactus Album on your device. Check the Messages box in Cactus Album for Mac for helpful information.
(5) Select the device you want to import from, then select Restore Complete Database in the Import Options section. You may also choose to Import Cacti and Watering Schedules, Import Cacti, or Import Watering Schedules.
(6) Once you’re satisfied with the selected device and import options, click the Import button.
(7) After the progress bar completes, an alert will appear indicating whether the import was successful. Click OK.
(8) The database in Cactus Album for Mac should now match the database on your device.

Note that the above steps will completely replace the contents of the Cactus Album database within Cactus Album for Mac, unless you’ve chosen not to restore the complete database. In that case, you may see duplicate entries in your database after the import is complete.

12. I have a Cactus Album database in Cactus Album for Mac I’d like to transfer to Cactus Album on my iPhone, iPad, or iPod touch. How do I accomplish this?

The steps are similar to question 11 above, except you must select either Restore Database or Import Database on your device, and click the Export Database button in the document window toolbar within Cactus Album for Mac. This is the toolbar button with the arrow pointing toward the device icon. When the export is complete, you should consult the pop-up alert on your device for further instructions.

13. I have an iPad, an iPhone, and a Mac. How do I keep the databases in sync between all of these devices?

Cactus Album currently doesn’t have a simple means of keeping databases synchronized on separate devices. However, it is still possible to transfer the database between devices manually. You first need to backup the database from the device with the most current copy to your computer (or from your computer to the device). The steps for achieving this are shown above in questions 11 and 12. A good workflow is to use your Mac as a hub for the database, updating that after you’ve made changes on your device.

14. I have the Cactus Album trial version and just bought the full version. How do I transfer my data from the trial version?

When you purchase the full version you’ll be provided with license details to unlock the app. The trial version and the full version are the same app – there is nothing further to download. All of your data will be accessible the next time you run the app.

If you’ve purchased via the Mac App Store, you’ll need to save the database from the trial version to somewhere you can easily locate (the Documents folder, or your desktop, for example), and load it within the Mac App Store version. The trial version of the app may then be deleted once you’ve transferred the database.

15. I have a whole spreadsheet of data I’d like to import into the app. How can I do that?

Provided your spreadsheet program can export to CSV format and allows you to specify comma separators and dates in a particular format, you should be able to import it into the app. Cactus Album expects to receive CSV data according to the CSV template file, available in the Downloads section of this site.

16. Can you incorporate some new fields into the app? Can I change the names of any of the data fields?

Incorporating new fields may be possible, but keep in mind that any changes will also need to be made to the iOS app version, where screen real estate is very limited. I’ve tried to select fields that would be useful for most people using the app, and have tried to minimize clutter as much as possible. The Notes field may be used to log information that isn’t captured by any other field. Sorry, the names of the data fields cannot be changed.

17. What is the X icon in the toolbar used for?

The ‘X’ icon (next to the ‘+’ icon in the toolbar) is used to delete a particular cactus, watering schedule, or log. It has no effect until you select an item from the list. Clicking on one of the rows in the table will select that row and highlight it. To delete the highlighted cactus, watering schedule, or log, click the X icon in the toolbar. Alternatively you may select Remove Item from the Edit menu. Note that an alert popup will appear asking if you still wish to delete the cactus. There is no such alert for watering schedules or logs.

18. How do I use the reminder feature?

First, pick a log entry or create a new one. Select Yes next to the Reminder field, and a popup will appear asking if you want to add a reminder to the calendar. Click Add and another window will appear where you can create a calendar entry. If there’s already an entry, it’ll allow you to edit it (or delete it). If Reminder is set to Yes, changing the date will also show a popup asking if you want to add/edit on the calendar. If you check your Mac’s calendar, the entry should be recorded against the date/time you set.

The idea is you set a future date, set Reminder to Yes, and the log entry will be highlighted on and after that date. The Reminders Due statistic is also updated. Once you’ve taken care of the task (fertilizing, repotting, etc), set Reminder back to No.

19. How do watering schedules work?

Watering schedules are a convenient way to remind you when certain plants in your collection need watering. You can configure how frequently they need watering (Water Every field), how much (Quantity field), when they were last watered, and when they shouldn’t be watered (No Water Between fields).

The app automatically calculates the next watering date based on the information you’ve entered. If there’s a conflict or insufficient information, you’ll see None Scheduled beside the Next Watering field.

The watering schedule entry will be highlighted on the main list when the Next Watering date arrives. Any corresponding cactus entries on the main list will also be highlighted on the same date.

Select the Watering field dropdown menu for individual plants to associate them with a certain watering schedule. If you have a lot of plants, a quicker way is to open the Watering schedule, then click the Cacti To Water tab. To add or remove plants from a certain Watering schedule, click the + button in the top right-hand corner. You can then select which plants to add to the schedule by clicking on them in the list. A blue watering-can icon will appear next to the plants you’ve selected. To remove a plant from the schedule, return to this window, click the plant and the watering-can icon will disappear. Alternatively, select the plant(s) on the Cacti to Water tab and click the – button.

By associating a plant with a watering schedule, the Last Watered and Next Watering fields for each associated plant will be updated automatically whenever the Watering schedule is updated. While it is possible to change the Last Watered field directly for individual plants, it is not recommended since the watering of this plant will become out of sync with the associated watering schedule.

20. How do I use the cacti report feature? How do I view the cacti report?

The cacti report shows a summary of your collection, followed by the data and photos for every cactus, watering schedule, and log entry in your collection. This report can be useful for inventory or insurance purposes, and may be printed from within your web browser.

Click the Export To -> HTML Report lines on the File menu.

(1) Select the Report Folder where you’d like to store the report and the corresponding photos.
(2) Enter a filename in the Report File field. Note that the photos will be stored in a sub-folder of the same name with a _photos suffix.
(3) Select whether you’d like to export a report with Small photos, Medium photos, Large photos, or Extra-Large photos, then click the Export button.
(4) A progress bar window will appear, followed by a popup when the export is complete.

To view the report, locate the Report Folder you specified in (1) and double-click on the Report File you specified in (2). Your web browser will load the cacti report.

A warning may appear asking if you are sure you want to open the file. Since you have generated the file yourself using the app, click the Open button. Your web browser will then load the cacti report. If you ever want to relocate the cacti report, be sure to move the similarly-named folder with the _photos suffix. This will ensure the report file will still know where to find the photos.

21. I have questions, feature requests, or concerns that aren’t listed above. How can I contact you?

You can reach me via email (CactusAlbum@andrewnicolle.com), on the Cactus Album Facebook page, or on Twitter (I’m @andrewnicolle). I can usually respond to queries within 24 hours. If you like Cactus Album for Mac, please spread the word. Thanks!

Tags: , , , , , , , , , , ,

Cactus Album for PC – Frequently Asked Questions (FAQ)

Cactus Album for PC

The following should address any questions or concerns you may have about Cactus Album for PC. I’ll be updating this post as new questions arise. Let me know if I’ve missed anything!

1. When will Cactus Album be available for PCs?

Cactus Album for PC is now available for download from my website here. You can learn more about Cactus Album for PC here.

2. What operating system do I need to be able to run Cactus Album for PC?

The app works on Windows XP SP3 / Vista / 7 / 8 / 8.1 / 10 / 11. It requires the .NET Framework 4, which will be installed automatically if your computer does not already have it. It also requires the .NET KB2468871 update patch. Outlook 2010 is required to store reminders on your computer’s calendar.

3. I already have Cactus Album on my iPhone, iPad, or iPod touch. Do I have to buy it again for the PC?

Yes, if you would like to run Cactus Album on your PC, you’ll need to purchase it direct from my site. The PC version includes some additional features over and above the iOS version, including photo organization, enhanced search, and printing capabilities. The app had to be substantially re-designed and completely re-written for the PC platform. Unfortunately porting the app to the PC wasn’t as simple as you might think!

4. I’m not sure if Cactus Album for PC will suit my needs. Is there a free trial version available?

Yes, it is available for download from my website here. The app is initially in an unregistered trial mode, limited to 3 cacti, 3 watering schedules, and 3 logs, with 3 photos each. It will also only allow a single database open at a time, and database import is disabled. That should be enough to give you some idea of whether the app will work for you. Purchasing a license either within the app or via my website unlocks full functionality.

5. Will Cactus Album for PC be localized into my language soon?

Possibly. Cactus Album is currently localized into English, French, Italian, German, Spanish, Portuguese, and Thai.

6. Is it possible to sort the cacti by species, rather than name?

Click Preferences… on the Tools menu and select the “Sort cacti by species” checkbox under Sort Options. Close the window and you’ll find all cacti are now sorted by species. Repeat these steps to sort by name again.

7. What is the purpose of the Type field on the Log Info window?

The type field is used by the app to determine what should be displayed in the Logs list for that log entry. For instance, selecting Cactus will show the cactus name selected in the Cactus field, and Note will show a brief summary taken from the Notes field. Select either Cactus or Note in the Type field depending on what information that particular log entry is recording.

8. How do I re-order the photos on the Cactus Info or Log Info windows?

After the entry has been saved, double-click on it and then click on the All Photos tab. This will show all the photos associated with the Cactus or Log. Click and hold the mouse button on the photo you’d like to organize on the Info window, and move the mouse to where you’d like the photo to be moved. Release the mouse button when you’re done.

To move a photo into one of the primary photo slots on the Cactus Info or Log Info windows, arrange the photos in the All Photos section. The primary photo slots will now reflect the new order.

9. How do I add text captions to my photos? How can I hide them to take a closer look at the photo?

Double-click on the photo you’d like to add a caption to in the All Photos tab of the Cactus Info or Log Info window. Click the word balloon icon at the top of the window, then in the text box that appears, type in the text caption you’d like to associate with that photo. Click on the photo to end editing the caption. The new or modified text caption will now be displayed. Note that only the first few lines of the caption will be superimposed over the photo. To hide the caption, click once on the photo. You can scroll between the photos by clicking the left and right arrow buttons, and zoom-in by resizing the photo window.

10. How do I capture sold, stolen or dead plants, or other events?

The place for capturing these events is on the Log Info window. Create a new Log entry, click the Event field and type in the new Event (Sold, for instance). The new Event will be saved when you click the OK or Save button. It will then be available for use with this and other log entries. In the Cactus field, select the corresponding cactus. Set the Type field to Cactus. Set the date the Event occurred, and add any relevant photos or notes. Click Save, and the new dated Log entry will appear in the list. Now when you tap the Log History button on the Cactus Info window, you’ll see the complete history of the cactus.

11. I have an Cactus Album database on my iPhone, iPad, or iPod touch. How do I transfer it to Cactus Album for PC?

You’ll need all devices on the same local WiFi network as your PC. Then follow these steps:

(1) Tap the Backup Database button on the Tools screen within the app on your device.
(2) Create a new database within Cactus Album for PC and save it to your Documents folder.
(3) Click the Import Database button in the document window toolbar within Cactus Album for PC. This is the button next to the printer button. The button has an arrow pointing to the right, away from the device icon. You can also select the Import from -> Cactus Album Mobile App item in the File menu.
(4) The Import Database window will appear. You should see your device shown in the Devices section. If it isn’t there, double-check that you’ve selected Backup Database (or Export Database) on the Tools screen within Cactus Album on your device. Check the Messages box in Cactus Album for PC for helpful information.
(5) Select the device you want to import from, then select Restore Complete Database in the Import Options section. You may also choose to Import Cacti and Watering Schedules, Import Cacti, or Import Watering Schedules.
(6) Once you’re satisfied with the selected device and import options, click the Import button.
(7) After the progress bar completes, an alert will appear indicating whether the import was successful. Click OK.
(8) The database in Cactus Album for PC should now match the database on your device.

Note that the above steps will completely replace the contents of the Cactus Album database within Cactus Album for PC, unless you’ve chosen not to restore the complete database. In that case, you may see duplicate entries in your database after the import is complete.

12. I have an Cactus Album database in Cactus Album for PC I’d like to transfer to Cactus Album on my iPhone, iPad, or iPod touch. How do I accomplish this?

The steps are similar to question 11 above, except you must select either Restore Database or Import Database on your device, and click the Export Database button in the document window toolbar within Cactus Album for PC. This is the toolbar button with the arrow pointing toward the device icon. When the export is complete, you should consult the pop-up alert on your device for further instructions.

13. I have an iPad, an iPhone, and a PC. How do I keep the databases in sync between all of these devices?

Cactus Album currently doesn’t have a simple means of keeping databases synchronized on separate devices. However, it is still possible to transfer the database between devices manually. You first need to backup the database from the device with the most current copy to your computer (or from your computer to the device). The steps for achieving this are shown above in questions 11 and 12. A good workflow is to use your PC as a hub for the database, updating that after you’ve made changes on your device.

14. I have the Cactus Album trial version and just bought the full version. How do I transfer my data from the trial version?

When you purchase the full version you’ll be provided with license details to unlock the app. The trial version and the full version are the same app – there is nothing further to download. All of your data will be accessible the next time you run the app.

15. I have a whole spreadsheet of data I’d like to import into the app. How can I do that?

Provided your spreadsheet program can export to CSV format and allows you to specify comma separators and dates in a particular format, you should be able to import it into the app. Cactus Album expects to receive CSV data according to the CSV template file, available in the Downloads section of this site.

16. Can you incorporate some new fields into the app? Can I change the names of any of the data fields?

Incorporating new fields may be possible, but keep in mind that any changes will also need to be made to the iOS app version, where screen real estate is very limited. I’ve tried to select fields that would be useful for most people using the app, and have tried to minimize clutter as much as possible. The Notes field may be used to log information that isn’t captured by any other field. Sorry, the names of the data fields cannot be changed.

17. What is the X icon in the toolbar used for?

The ‘X’ icon (next to the ‘+’ icon in the toolbar) is used to delete a particular cactus, watering schedule, or log. It has no effect until you select an item from the list. Clicking on one of the rows in the table will select that row and highlight it. To delete the highlighted cactus, watering schedule, or log, click the X icon in the toolbar. Alternatively you may select Remove Item from the Edit menu. Note that an alert popup will appear asking if you still wish to delete the cactus. There is no such alert for watering schedules or logs.

18. How do I use the reminder feature?

First, pick a log entry or create a new one. Select Yes next to the Reminder field, then click the OK or Save button. A popup will appear asking if you want to add a reminder to the calendar. Click Add and another window will appear where you can create a calendar entry. If there’s already an entry, it’ll allow you to edit it (or delete it). If you check your calendar in Outlook, the entry should be recorded against the date/time you set.

The idea is you set a future date, set Reminder to Yes, and the log entry will be highlighted on and after that date. The Reminders Due statistic is also updated. Once you’ve taken care of the task (fertilizing, repotting, etc), set Reminder back to No.

19. How do watering schedules work?

Watering schedules are a convenient way to remind you when certain plants in your collection need watering. You can configure how frequently they need watering (Water Every field), how much (Quantity field), when they were last watered, and when they shouldn’t be watered (No Water Between fields).

The app automatically calculates the next watering date based on the information you’ve entered. If there’s a conflict or insufficient information, you’ll see None Scheduled beside the Next Watering field.

The watering schedule entry will be highlighted on the main list when the Next Watering date arrives. Any corresponding cactus entries on the main list will also be highlighted on the same date.

Select the Watering field dropdown menu for individual plants to associate them with a certain watering schedule. If you have a lot of plants, a quicker way is to open the Watering schedule, then click the Cacti To Water tab. To add or remove plants from a certain Watering schedule, click the + button in the top right-hand corner. You can then select which plants to add to the schedule by clicking on them in the list. A blue watering-can icon will appear next to the plants you’ve selected. To remove a plant from the schedule, return to this window, click the plant and the watering-can icon will disappear. Alternatively, select the plant(s) on the Cacti to Water tab and click the – button.

By associating a plant with a watering schedule, the Last Watered and Next Watering fields for each associated plant will be updated automatically whenever the Watering schedule is updated. While it is possible to change the Last Watered field directly for individual plants, it is not recommended since the watering of this plant will become out of sync with the associated watering schedule.

20. How do I use the cacti report feature? How do I view the cacti report?

The cacti report shows a summary of your collection, followed by the data and photos for every cactus, watering schedule, and log entry in your collection. This report can be useful for inventory or insurance purposes, and may be printed from within your web browser.

Click the Export To -> HTML Report lines on the File menu.

(1) Select the Report Folder where you’d like to store the report and the corresponding photos.
(2) Enter a filename in the Report File field. Note that the photos will be stored in a sub-folder of the same name with a _photos suffix.
(3) Select whether you’d like to export a report with Small photos, Medium photos, Large photos, or Extra-Large photos, then click the Export button.
(4) A progress bar window will appear, followed by a popup when the export is complete.

To view the report, locate the Report Folder you specified in (1) and double-click on the Report File you specified in (2). Your web browser will load the cacti report.

21. I have questions, feature requests, or concerns that aren’t listed above. How can I contact you?

You can reach me via email (CactusAlbum@andrewnicolle.com), on the Cactus Album Facebook page, or on Twitter (I’m @andrewnicolle). I can usually respond to queries within 24 hours. If you like Cactus Album for PC, please spread the word. Thanks!

Tags: , , , , , , , , , ,

Announcing Cactus Album for Mac & PC

“Cactus Album

Back in early 2014, at the height of my cactus collecting mania, I released a cactus and succulent tracking app called Cactus Album on the iOS App Store. Over the years I’ve had emails asking if I had any plans for Mac or PC versions of the app. Being busy with other projects, the answer was always no. Until today!

Since I’m nearing the end of some major Bonsai Album app updates for 3 platforms (iOS, Mac & PC), today I can finally announce I’ve started working on the desktop versions of Cactus Album. I’ll be releasing both Mac and Windows PC versions, hopefully on the same day in the not-too-distant future.

I surveyed fans of the iOS app, asking which platform they would prefer: Mac or PC. The response was resoundingly in favour of a Mac version. Not wanting to disappoint anyone with a PC (myself included!), I’ve decided to develop for both platforms in parallel.

These new desktop apps will allow transferring your database to and from the iOS version via WiFi. Like the iOS version, I also plan to support multiple languages, including English, French, Italian, German, Spanish, Portuguese, and Thai. In addition to both versions being available direct from my website, the Mac version will also be available via the Mac App Store. Free trial versions will be available for download from my site, and can be unlocked with purchase of a license, with separate licenses per platform.

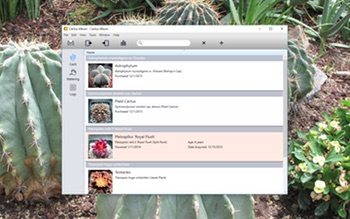
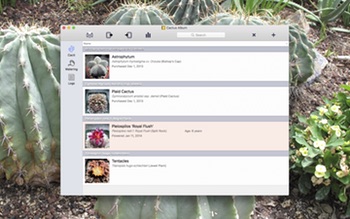
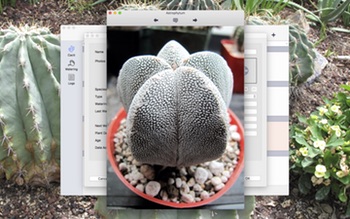
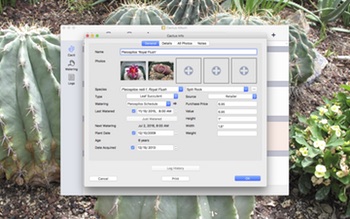
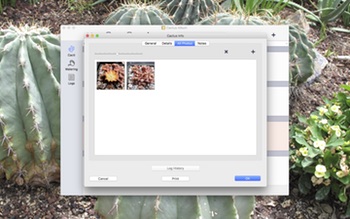
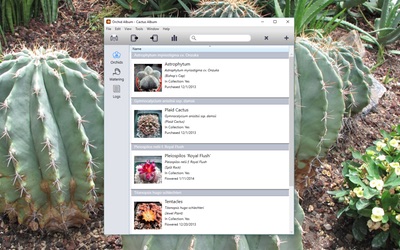
What might Cactus Album look like on the desktop? Here’s a mockup screenshot I put together from one of my other apps:

Update 29-Oct-16: Cactus Album for Mac is now available!
Update 4-Nov-16: Cactus Album for PC is now available!

If you’re interested in learning more about Cactus Album, visit the Cactus Album Facebook page or the Cactus Album for Mac or Cactus Album for PC pages on my site.

Tags: , , , , , , , , ,

Bonsai Album v2.6 update now available for iPhone, iPad and iPod touch

The Bonsai Album v2.6 update is now available on the App Store for iPhone, iPad, and iPod touch.

Bonsai Album makes keeping track of your bonsai or penjing collection easy, whether you’re new to bonsai, a collector, a dealer, or even a bonsai master.

Bonsai Album

This update contains the following changes:

Note: This update requires iOS 6 or higher!

  • Added iOS 9 support
  • Added iPad Pro support
  • Bug fixes

If you’re enjoying the app, please take a moment to rate or review it on the App Store!

You can learn more about Bonsai Album at my website or on the Bonsai Album Facebook group.

Tags: , , , , ,